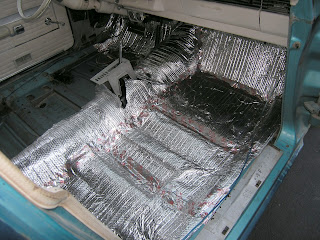
Spent a little time working on the wagon today after taking several days off from it due to my busy schedule this week. Today I decided to get the shifter in the car.
But, before I could do that, I wanted to redo the seam seals along the toe boards and floor pan edges up front. And, I also wanted to start the insulation on the floor so I didn't have to work around the shifter for either process.
I highly recommend redoing the seam seals in any of these old cars. Mine looked nearly flawless with only a small amount of surface rust at the seam, but any rust means moisture is leaking past the seal. As it turns out, you could pick better than half of the seal out of the joint with your finger and it would come off in large chunks. After this much time, the caulk they use has all but released and the area is very porous.
It took me literally 15 minutes to pick out 98% of the caulk and vacuum it up. Anything that wouldn't pick out of deep grooves easily that was still soft I just left. Otherwise it was just some very light duty scraping with a putty knife.
Once that was cleared out I washed everything with Simple Green and let it dry. At 90+ degrees and light clouds dry time was quick. Next I hit all of the seams with DupliColor Rust Fix. It will convert exposed surface rust to a black oxide substance on the surface and should significantly slow any rust processes down. And since this car won't see salt, the treatment might very well outlast me.
Next, after allowing enough time for the Rust Fix to flash dry I stuffed the seams with strip caulk so they were filled and covered. It will remain pliable for about the next 40 years, so once again, this should be a one-time fix. Then to complete the seal I used Eastwood Products Seam Sealer. It comes in a quart can is is brushable. I use a 2" stiff China brush.
The consistency is pretty much exactly the same as Bondo. So is the smell. So is the color. And I have a sneaking suspicion, so is the chemical make-up. I will investigate further to satisfy my own curiosity, but for now we'll pretend I didn't spend $20+ on a $8 can of Bondo.
Anyhow, the sealer bushes on a bit messy looking, but do your best not to dab. It will lay down and smooth out to a great extent all on it's own.
This will start to set up pretty quickly and the surface will dry to the point that you can work over it or even paint on it within probably 30 minutes. The odor will last much longer. After 7 hours it is still strong.
Next up I started to lay in the new floor insulation. The original asphalt insulation is very heavy, and not nearly as effective as many newer options. I have also heard that it can sweat and trap moisture between it and the floor pan when changing temps or humidity quickly such as we get when night falls and temps can drop 30+ degrees in the evening creating large amounts of condensation on vehicles.I can't personally confirm this claim, but again, the threat alone is reason enough in my opinion.
So with all of the different options out there, what I have opted to use is what many guys I know are using as well and that is, as Home Depot markets it, barn insulation. Basically its a roll of bubble wrap with a very thin foil surface on either side so it will reflect heat, and insulate noise.
I have used this in my basement to insulate the heat ducts for years, so I know it works. It's also very easy to work with, and a LOT LESS EXPENSIVE than other products such as Dynamat. It forms and contours to the floor quite well. It cuts with scissors, and you use aluminum duct tape to tape it down. The results speak for themselves.
Once I got to this point it was time to install the shifter. I punched a hole in the insulation, drilled my mounting holes, added the strip caulk to the bottom of the shift hump, and then ... scratched my head. The shifter mounts to a reinforcement stamping the bolts up from the bottom of the vehicle, and the bolts go in through the top, through the floor pan, and into the reinforcement plate. This left me without an ability to hold the plate in place while trying to bolt the shifter in place.
I ended up having to wedge a board up under the car to prop it up in place so I could get the first bolt to catch. After that it was smooth sailing. I got everything bolted into place and filled in the entire perimeter with strip caulk to seal it off. And, it looks great! But, when I went to shift into another gear I discovered the that my '67 shifter I am installing fits differently than the '68 shifter I used to cut my hole.
I had purchased a '68 console originally that came with the shifter and the section of the floor pan that was cut out as well. I used that as a template to cut the new hole which turns out to be too small for a '67 since the shifter now hits the floor pan. Doh! This will be correct next time out with the nibbler from the underside, raining tiny crescents of sharp metal down. Oh well, a small price to pay to have it right.


No comments:
Post a Comment