Things are moving along great. The front suspension is almost completely rebuilt and looking great. Upper and lower control arms, new end links, new center bushings and the mounts are cleaned up and repainted, sway bar cleaned and painted, and the strut rods cleaned up painted.
I have also cleaned up and painted the drive shaft, finished up the inner wheel houses (the passenger's side needed a small welding repair to the battery tray), and have replaced the one small rust damage spot on the frame with a small patch.
In other news, a couple of very cool finds ... I got a correct, 1967 Mercury Monterey console with shifter in very good shape. Although the shifter is a long ways off from being as cool as the '68, it goes very well with the way-cool, and ultra-rare, power locks set up that I picked up. It's actually part of the convenience group that is built into the console. Going to need a bit of work to get it looking nice, but it will clean up nicely.
I'll post some pictures soon!
Monday, April 23, 2012
Wednesday, April 11, 2012
Finish coating with Eastwood Extreme Black and how to remove hood springs...
Got a day to work on the car and nice weather to boot, so I put a coat of Eastwood's Extreme chassis Black on the radiator support and DS inner wheel house. It brushed on smooth and the top side of the wheelhouse got sprayed from the rattle can and it went down well also. They are now ready to go!

I also cleaned up the horns ...

And, I wanted to include a quick tip on removing the springs from the hood hinges. I always heard to use nails in between the coils of the springs. Basically you open the spring by "closing" the hinge. It takes a bit of muscle. Once you have it compressed, you drop in the nails (or hex wrenches in my case) to take up the space and then open the hinge back up.
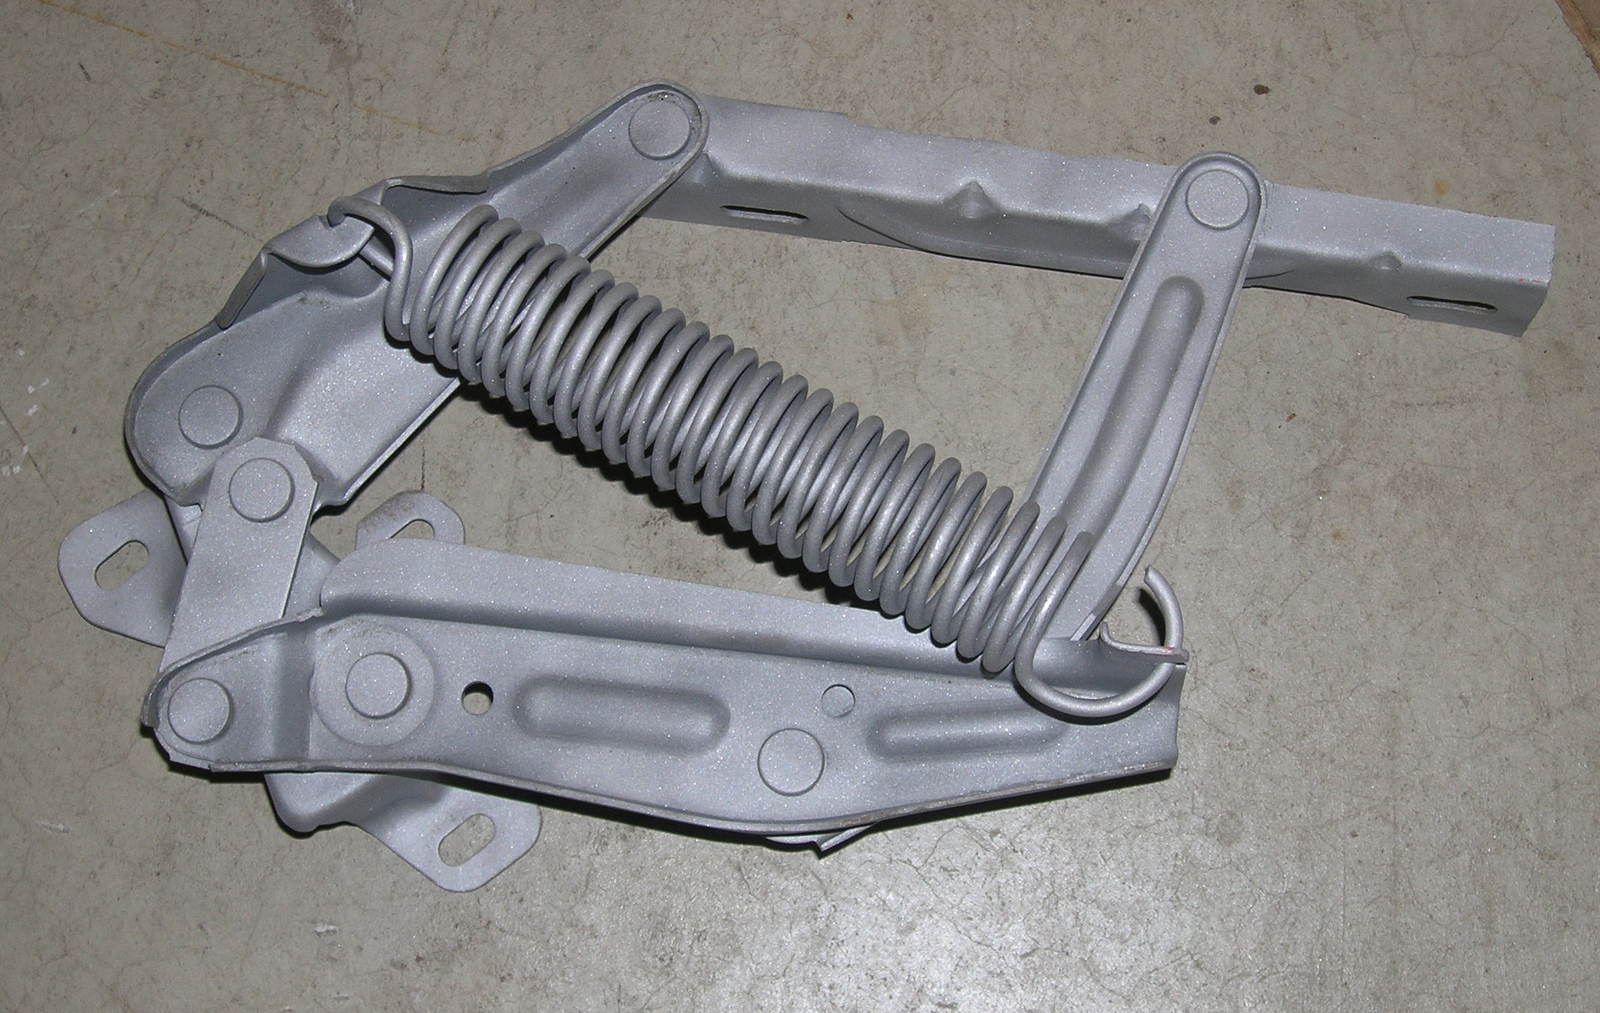

I blasted the entire assembly before removal of the spring. One the spring was removed, I painted the ends of the spring. I painted the rest of the hinge, and then reinstalled the spring. Last step was to mask the hinge and paint the spring in place. With this spring, it is always under tension and there is always room between the coils, so that was the best way to paint the springs. This won't be a show car, but it will still look great when it is done!
Saturday, April 7, 2012
More Paint Work and Minor Assembly!
Well, I'm finally getting to see the fruits of my labors on a few things. I have completed the hood hinge for one side of the car and it looks awesome! See the picture showing the un-restored passenger's side hinge vs. the restored driver's side.


I can now take do the passenger's side. When I get ready to paint that one I will show a trick on how to remove and paint the spring. I also have finished up rebuilding one of the upper control arms. I had to straighten out where one of the bushings go, but 10 minutes in the garage with a sledge, a section of a 4x4 and 2x4 did the trick!


New bushings and a new ball joint were installed. The bushings went in easily thanks to the addition of my new bushing removal/installation tool. It's really just an over-glorified C-clamp with some fittings, and an open end, but it works great. It wasn't cheap, but I'm glad I got it.
I still need to break out the welder for a couple of very small repairs. One to the frame, one to a weld nut on the inner wheelhouse on the passenger's side under the battery tray. Tomorrow I will be painting the A/C condensor. I cleaned it up today and hit it with Rust Fix, so it should be ready for a top coat of gloss black lacquer tomorrow afternoon. I'll try to get some additional pics of completed work as I go. So far the front end is looking like it will very nice!
Monday, April 2, 2012
More work on clean up...
Well, I finished the clean up on the fasteners and they turned out great. I decided to let them sit a couple of days in the solution and they were spotless after they came out of the solution.
I also worked on the one spring assembly. It is painted and I got the spring painted up as well. There is a trick to it which I will share when I do the opposite side.


The pics above are in process.
I finished up the Rust Encapsulator on the one wheel house. I decided to spray the top side so there would be no brush marks. It turned out very nice, so I will do the same with the other side as well which is now half way stripped. I will been to do a little metal work on this side, however since it is the battery side and they is a little damage to repair. The firewall with be sprayed as well when it is ready, but the rest of the underside will be brushed wherever possible.
In other news, I found a serpentine belt set up off of a later model 460 that I picked up and will give a try at using. I think it will make for a different look.
I am also going to get the bucket seats and floor shifter going. The shifter hump needs a small amount of repair, but is very minor. The tough part will be repairing the shifter arm. The lower section is gone, and I had to buy a floor shifter from a Mustang so I can cut off the bottom and repair it.
More pictures to follow.
Subscribe to:
Comments (Atom)