I heard back from my upholstery guy earlier this week and looks like I will have my seat covers within the next two weeks, so I got started on cleaning up the buckets.
I had already started the lowers and made some repairs, but I needed to finish disassembling the uppers and make any repairs that were needed to them as well.
After getting the covers off I noticed that there are definitely some areas in the foam that will need some work. Peeling that away revealed a couple more broken springs and the latch assemblies were frozen in place. I clipped away the remaining hog-nose rings from the frames, dumped out the remaining garbage from inside the frames and bagged them up for my blaster guy.
Today I dropped them off for cleanup. 2 hours and $100 later, I have shiny clean frames that needed to be primed and painted. One of the bases had another broken spring which I quickly welded up and them put them in primer while I assessed the damage to the uppers.
Before sending the uppers out I disassembled the rod assembly that runs from the release handle down to the latch and worked both free with a few taps with a hammer. Working it back and forth several times smoothed out operation so it could be blasted in different positions to eliminate as much rust as possible. Getting them back post blasting required working them once more to remove any debris.
After repairing the damage to the to the one upper that had some rust issues, they received a coat of zinc-rich primer and the bases got a coat of Eastwood's Extreme Chassis Black followed by the uppers. With the high humidity it will be at least a day before they dry enough for me to start building up the seats for the new covers, but they are now well on the way!
Thursday, July 19, 2012
Wednesday, July 18, 2012
A Little Change...
Well, I haven't been able to get as much done the last couple of weeks due to the fact that I have sold my Cobra project off. I had three projects and room for only two, so one had to go. Sad to see it go, but it means I will be able to do more with the remaining two than I had originally hoped.
This will also give me some additional room to get things done, so it isn't all bad.
Anyhow, more updates to come.
This will also give me some additional room to get things done, so it isn't all bad.
Anyhow, more updates to come.
Replaced the Gas Line...
A little over a week ago (sorry for the delay!) my buddy Paul was out and we got to work on pulling the gas line. Like any of these "little" projects, there are always seven other things you need to do along the way, so a simple job turns into an afternoon project.
We started by getting the back driver's side of the car up off the ground pretty high to drain the tank, but quickly decided to drop it altogether so we could inspect it as long as we were in there.
To get the tank out, we needed to remove the wheelhouse pan that protects the tank, and to get to that, you really should pull the wheel. Since I haven't checked out the rear brakes yet, now seemed like a good time.
The brakes looked great, but the drum was a completely different matter. It showed heavy wear, so we lifted the other side of the car, pulled the drum, and headed up to the parts store. They measured them up, but couldn't find a spec anywhere in the store or on the web. Ended up getting the number from the counter guy and headed back home to look them up in the shop manual. .100 over max on one, and .120 on the other. Nearly 1/8" beyond max wear means I have a new set of drums in my future. But for today, they go back on.
The tank itself comes out pretty easily. after covering my head in Texas dirt and old mud dauber nests I got the tank free. Less than 1/2 cup of gas left in the tank and it looked very clean with just a little varnish. This tank will get a little cleaning, and a fresh coat of paint, and then it will go back on as is.
Next we stripped out the old fuel line. It was a clear plastic flexible line running from a 24" long rubber hose all the way to the front of the vehicle. We had a roll of new steel fuel line the we unwound and started to fish through. I was tricky getting it to have just the right contours so it would drop into the clips without binding against anything. LOTS of tweaking the line.
At this point, the line is run, but hasn't been cut to length. We have a little extra at the tank, and the engine compartment end will be finished after the intake and carb have been mounted as I may run this up along the firewall so I don't have to have a fuel line on the front of the engine. I think it will look much cleaner that way, but we'll have to see in a while.
More to come!
Thursday, July 5, 2012
Fixed The Door Handle...
Yea, I know, it may not seem like a big project, but if you had to reach in through the window to open the door every time, it would start to seem awfully important to you, I bet.
Anyhow, today was the day to fix the door handle on the driver's door, and while I have it apart, insulate the door, clean it out, and grease the window tracks. The button from the handle was completely gone, however the inside handle fortunately still functions normally.
After removing both window cranks (yes, you read that correctly, the vent uses a crank) the door handle, arm rest, mirror adjuster bezel, lower trim, lock pull knob, and one mounting screw at the top, I popped the 6 door panel clips and removed the panel.
The factory tar-coated craft paper "seal" was still intact and in pretty good shape, all things considered. But, I'm upgrading, so off to the trash it went revealing avery nice door with a pile of spray-on sound deadener in a pile of the inside of the door. It tends to dry up and release from the door skin over time adding rattles to the door, and plugging up the drains on the bottom of the door.
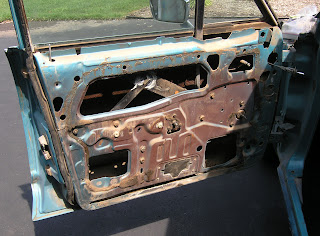
Note: the redish color at the center of the door is the factory red-oxide primer, not rust. Fortunately, rust is pretty hard to come by on this car. There are a couple places, but we'll address those in the future.
Anyhow, the door handle removes with two nuts from inside the door and pops right out. Easy to do. Sure enough, the button was gone and nowhere to be found in the pile of rubble at the bottom of the door. I cleaned and vacuumed out the bottom of the door, then turned back to the repair. I already had purchased a handle from a '67 Monterey for a donor. The handle itself was in fair condition, but the button only had a couple pits on the bottom, so I removed the button and installed it onto my handle.
Reinstalling it was almost as easy as removal. The only tricky part was making sure the handle gaskets stayed in their proper orientation which really isn't that hard to do. They run between the handle and the door face and you can see the thin black line at the perimeter.

A quick open and close test confirmed success! Before going any further I went ahead and hit the tracks with white lithium grease to help keep operation smooth.
Now all I needed to do before reassembly was add my new insulation. I am using the same material that I did on the floor (bubble wrap with aluminum facing). I have a 2 foot wide roll which is perfect for the door completely covering it top-to-bottom leaving a small amount of room to trim to fit.
I lined it up on the door, presses where the handle and cranks go to mark it and then punched holes with a screwdriver. From there I used a couple pieces of the aluminum tape to hold it in place and cut an "X" for the window adjuster to poke through. Finally I trimmed to fit while on the door and taped it down as I went.
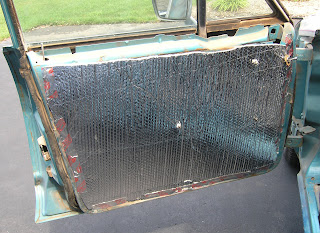
From there I just reassembled the door. Although the insulation is thicker than the factory tar paper, if you keep it cut back just a touch, it will have almost zero affect on how your door panel lays when installed.
Sunday, July 1, 2012
Seat Repairs...
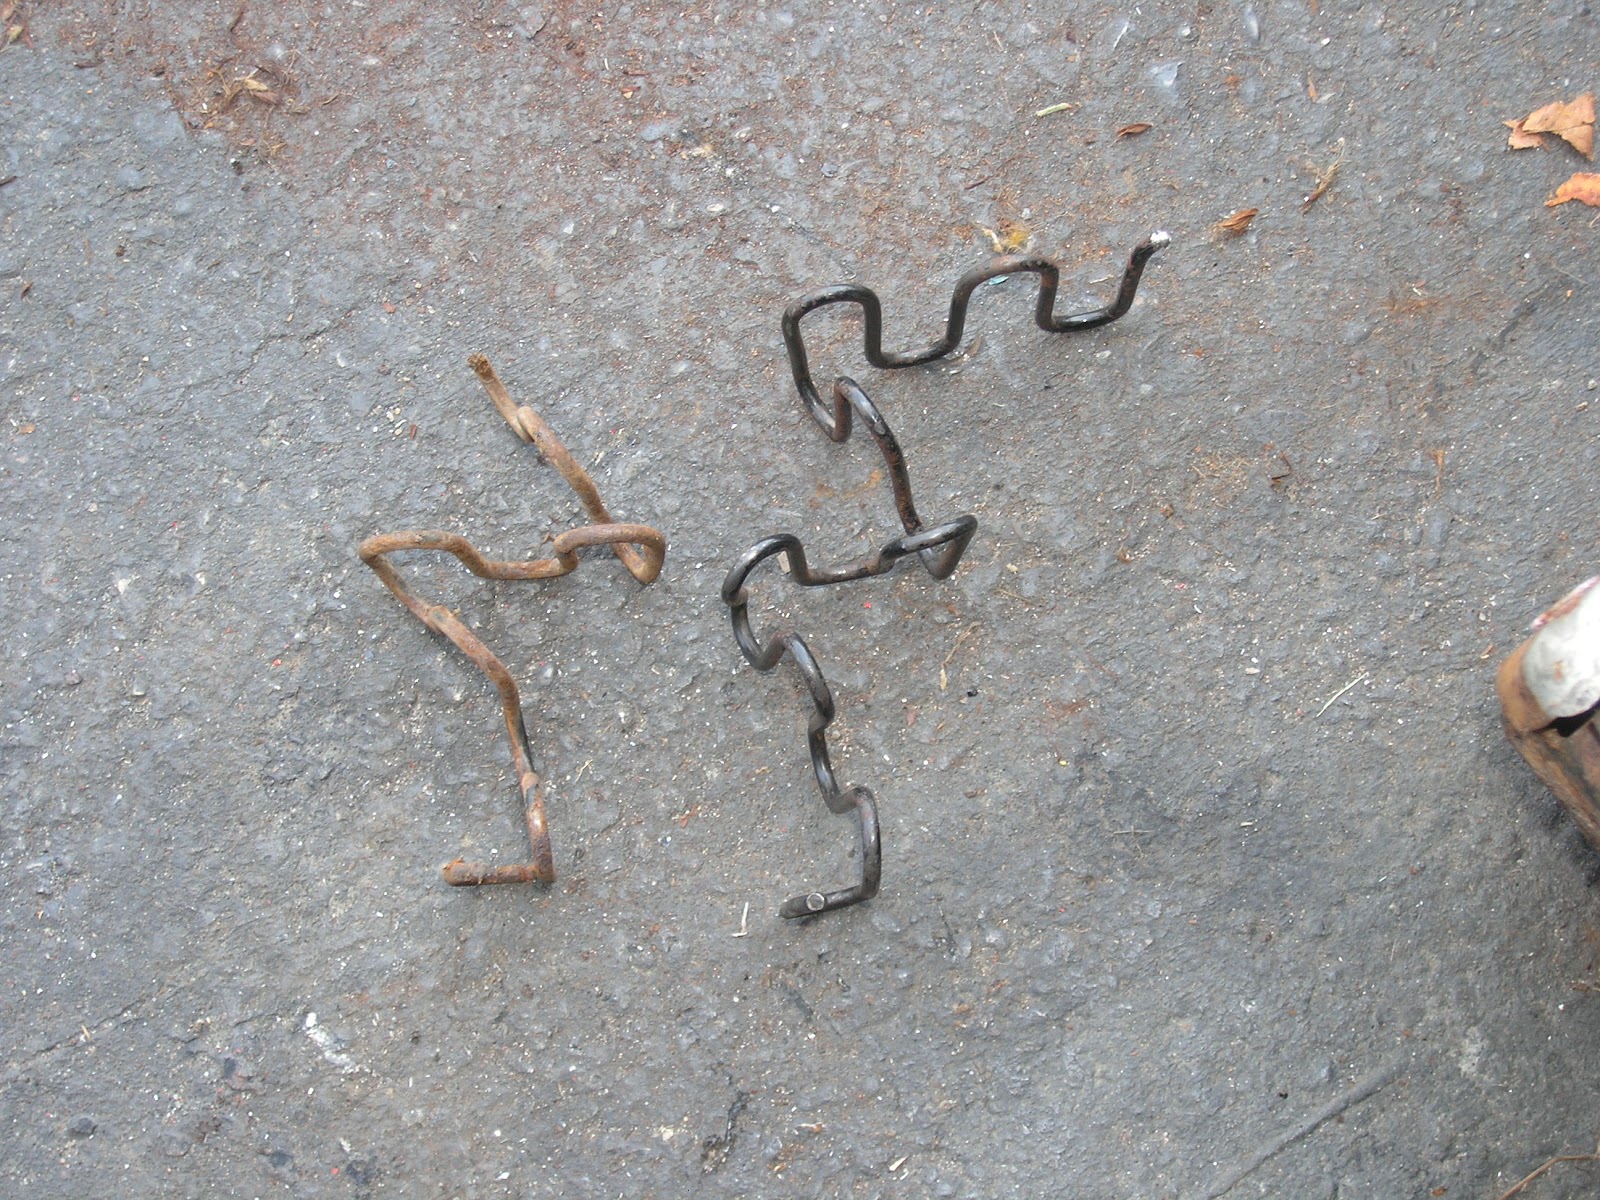
I have three broken springs: one in the front, and two on the outboard side of the base. For a while now I have been trying to find seat springs or a donor seat base to repair it, but to no avail. One guy on eBay wanted $35 a spring while another person I contacted offered me 2 springs for $50, but I just can't justify it after only spending $185 for the buckets, console and shifter.
So, today was the day to fix the seat. The front spring I just welded up. Done and done.

The second one was a little more work, but still pretty easy. Since both pieces were there, I just used a couple of hog-nose rings tie them together and then welded them together. Worked just fine.

The third spring, on the other hand, was broken beyond repair. Fortunately I remembered that I have a 1968 Mustang bucket seat that I had picked up for about $20 a while back, so I thought I would check to see if there might be a spare on the base. No luck, but I did notice that the spring coils were the same.


Time to break out the pliers, a hammer and a vice and see if we can bend the spring to match. It was little bit of work, but I managed to get it bent and to get it pretty darn close without any concern of snapping the spring.


Once installed you almost couldn't tell it from original. A cheap fix, and it feels just like the opposite side of the seat. Now I need to address the upper seat backs as the driver's side latch isn't working properly, and it will need a couple spot repairs due to rust. More to come!
So, today was the day to fix the seat. The front spring I just welded up. Done and done.

The second one was a little more work, but still pretty easy. Since both pieces were there, I just used a couple of hog-nose rings tie them together and then welded them together. Worked just fine.

The third spring, on the other hand, was broken beyond repair. Fortunately I remembered that I have a 1968 Mustang bucket seat that I had picked up for about $20 a while back, so I thought I would check to see if there might be a spare on the base. No luck, but I did notice that the spring coils were the same.


Time to break out the pliers, a hammer and a vice and see if we can bend the spring to match. It was little bit of work, but I managed to get it bent and to get it pretty darn close without any concern of snapping the spring.

Once installed you almost couldn't tell it from original. A cheap fix, and it feels just like the opposite side of the seat. Now I need to address the upper seat backs as the driver's side latch isn't working properly, and it will need a couple spot repairs due to rust. More to come!
Carpet Installation, part 2
Taking advantage of the sunshine and hot weather, I spent a little more time working on the carpet install Saturday and Sunday. I started by digging out the remaining old seam sealer that was left in the back seat area, Cleaned it up, and finished putting down a new coat of seam sealer that will hopefully last for many years to come. Following that, I finished up laying down the new insulation/sound deadener.


All said and done, I probably have less than $75 into the entire deal with enough leftover material to just about do a second vehicle.
Next up I started the carpet install. Starting with the back seat and working my way forward, the fit was pretty good. But, a couple points of note:
1) The pans are quite deep which mean you will have bunching in the corners as the carpet comes out of the wells and transitions into the rocker area. No avoiding it, just minimizing it.
2) Because the carpet is for a 4-door, and this is a wagon, the carpet is too short in the back corners next to the second-row seat hinge. It's an easy enough fix with the excess that will be trimmed away.
I let the carpet warm up on the blazing hot asphalt before fitting it to the pan. This seemed to help some with getting it to lay right. But, like every other set of carpet I have installed, noting is quite 100%, so a fair amount of stretching and fitting is required prior to trimming. Do not expect to just drop this in place.


The front is a bit more work to fit. I did get it most of the way in and cut the hole for the shifter. Fortunately this doesn't have to be to machining tolerances since I will be using a center console. Just the same, I kept it pretty darn close.


Next time out I will have to finish up fitting/trimming it and cut the hole for the high-beams switch. Tomorrow night after the kids are off to bed I will probably stack up some books in the corners to help the carpet relax into the correct form. A nice, easy project.
Subscribe to:
Comments (Atom)