Yea, I know, it may not seem like a big project, but if you had to reach in through the window to open the door every time, it would start to seem awfully important to you, I bet.
Anyhow, today was the day to fix the door handle on the driver's door, and while I have it apart, insulate the door, clean it out, and grease the window tracks. The button from the handle was completely gone, however the inside handle fortunately still functions normally.
After removing both window cranks (yes, you read that correctly, the vent uses a crank) the door handle, arm rest, mirror adjuster bezel, lower trim, lock pull knob, and one mounting screw at the top, I popped the 6 door panel clips and removed the panel.
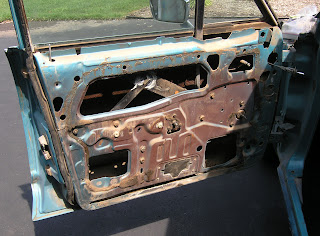
The factory tar-coated craft paper "seal" was still intact and in pretty good shape, all things considered. But, I'm upgrading, so off to the trash it went revealing avery nice door with a pile of spray-on sound deadener in a pile of the inside of the door. It tends to dry up and release from the door skin over time adding rattles to the door, and plugging up the drains on the bottom of the door.
Note: the redish color at the center of the door is the factory red-oxide primer, not rust. Fortunately, rust is pretty hard to come by on this car. There are a couple places, but we'll address those in the future.
Anyhow, the door handle removes with two nuts from inside the door and pops right out. Easy to do. Sure enough, the button was gone and nowhere to be found in the pile of rubble at the bottom of the door. I cleaned and vacuumed out the bottom of the door, then turned back to the repair. I already had purchased a handle from a '67 Monterey for a donor. The handle itself was in fair condition, but the button only had a couple pits on the bottom, so I removed the button and installed it onto my handle.
Reinstalling it was almost as easy as removal. The only tricky part was making sure the handle gaskets stayed in their proper orientation which really isn't that hard to do. They run between the handle and the door face and you can see the thin black line at the perimeter.
A quick open and close test confirmed success! Before going any further I went ahead and hit the tracks with white lithium grease to help keep operation smooth.
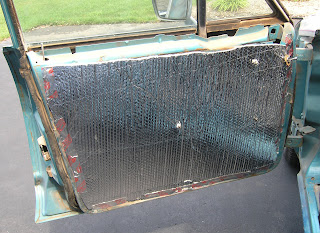
Now all I needed to do before reassembly was add my new insulation. I am using the same material that I did on the floor (bubble wrap with aluminum facing). I have a 2 foot wide roll which is perfect for the door completely covering it top-to-bottom leaving a small amount of room to trim to fit.
I lined it up on the door, presses where the handle and cranks go to mark it and then punched holes with a screwdriver. From there I used a couple pieces of the aluminum tape to hold it in place and cut an "X" for the window adjuster to poke through. Finally I trimmed to fit while on the door and taped it down as I went.
From there I just reassembled the door. Although the insulation is thicker than the factory tar paper, if you keep it cut back just a touch, it will have almost zero affect on how your door panel lays when installed.


No comments:
Post a Comment