After yet another delay, I have finally been given a date for the seat covers: September 5th! With any amount of luck, I will have them back here that weekend and I can FINALLY finish up the seats.
While waiting I have finished up porting the heads and sent them off to the machine shop to prep them for installation. I have also finished the driver's side header and will hopefully knock out the passenger's side before the seat covers get back. Starting to feel like I might hear the motor run soon...
More to come as I have it ready.
Thursday, August 30, 2012
Wednesday, August 1, 2012
No Seat Covers, Yet ...
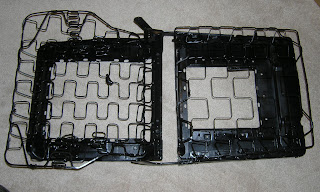
I just called the upholstery guy back and heard that it will be another 2 weeks before he can START them! Grrrrrr! At least the bucket frames are ready to assemble. I just picked up some new padding to run on top of the foam which is supposed to offset any flattening in the foam.
I will fully prep them for covers this weekend so when the covers are actually done it's just a matter of putting them on.
In the meantime I will work on wrapping up some of the other projects (adjust shifter linkages, finish headers, etc.) so it will be ready to go when they get here.
Here are a couple pics of the finished seat frames:


Thursday, July 19, 2012
Work On The Seats...
I heard back from my upholstery guy earlier this week and looks like I will have my seat covers within the next two weeks, so I got started on cleaning up the buckets.
I had already started the lowers and made some repairs, but I needed to finish disassembling the uppers and make any repairs that were needed to them as well.
After getting the covers off I noticed that there are definitely some areas in the foam that will need some work. Peeling that away revealed a couple more broken springs and the latch assemblies were frozen in place. I clipped away the remaining hog-nose rings from the frames, dumped out the remaining garbage from inside the frames and bagged them up for my blaster guy.
Today I dropped them off for cleanup. 2 hours and $100 later, I have shiny clean frames that needed to be primed and painted. One of the bases had another broken spring which I quickly welded up and them put them in primer while I assessed the damage to the uppers.
Before sending the uppers out I disassembled the rod assembly that runs from the release handle down to the latch and worked both free with a few taps with a hammer. Working it back and forth several times smoothed out operation so it could be blasted in different positions to eliminate as much rust as possible. Getting them back post blasting required working them once more to remove any debris.
After repairing the damage to the to the one upper that had some rust issues, they received a coat of zinc-rich primer and the bases got a coat of Eastwood's Extreme Chassis Black followed by the uppers. With the high humidity it will be at least a day before they dry enough for me to start building up the seats for the new covers, but they are now well on the way!
Wednesday, July 18, 2012
A Little Change...
Well, I haven't been able to get as much done the last couple of weeks due to the fact that I have sold my Cobra project off. I had three projects and room for only two, so one had to go. Sad to see it go, but it means I will be able to do more with the remaining two than I had originally hoped.
This will also give me some additional room to get things done, so it isn't all bad.
Anyhow, more updates to come.
This will also give me some additional room to get things done, so it isn't all bad.
Anyhow, more updates to come.
Replaced the Gas Line...
A little over a week ago (sorry for the delay!) my buddy Paul was out and we got to work on pulling the gas line. Like any of these "little" projects, there are always seven other things you need to do along the way, so a simple job turns into an afternoon project.
We started by getting the back driver's side of the car up off the ground pretty high to drain the tank, but quickly decided to drop it altogether so we could inspect it as long as we were in there.
To get the tank out, we needed to remove the wheelhouse pan that protects the tank, and to get to that, you really should pull the wheel. Since I haven't checked out the rear brakes yet, now seemed like a good time.
The brakes looked great, but the drum was a completely different matter. It showed heavy wear, so we lifted the other side of the car, pulled the drum, and headed up to the parts store. They measured them up, but couldn't find a spec anywhere in the store or on the web. Ended up getting the number from the counter guy and headed back home to look them up in the shop manual. .100 over max on one, and .120 on the other. Nearly 1/8" beyond max wear means I have a new set of drums in my future. But for today, they go back on.
The tank itself comes out pretty easily. after covering my head in Texas dirt and old mud dauber nests I got the tank free. Less than 1/2 cup of gas left in the tank and it looked very clean with just a little varnish. This tank will get a little cleaning, and a fresh coat of paint, and then it will go back on as is.
Next we stripped out the old fuel line. It was a clear plastic flexible line running from a 24" long rubber hose all the way to the front of the vehicle. We had a roll of new steel fuel line the we unwound and started to fish through. I was tricky getting it to have just the right contours so it would drop into the clips without binding against anything. LOTS of tweaking the line.
At this point, the line is run, but hasn't been cut to length. We have a little extra at the tank, and the engine compartment end will be finished after the intake and carb have been mounted as I may run this up along the firewall so I don't have to have a fuel line on the front of the engine. I think it will look much cleaner that way, but we'll have to see in a while.
More to come!
Subscribe to:
Posts (Atom)